Make Blinking Neon Forms with CSS3 and jQuery
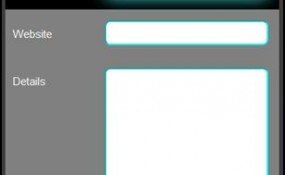
This cool form effect has the usual attributes we enjoy — rounded corners, stroke edges and other CSS-generated qualities. But thanks to web developer Rakesh Menon, this one’s got another thing up its sleeve: it’s got a glowing neon border that pulsates!
Here’s the demo for you to really appreciate it. Click here for the source files (/zip).
Now let’s start the tutorial with the xHTML to setup the layout.
xHTML
| <!DOCTYPE html PUBLIC “-//W3C//DTD XHTML 1.0 Transitional//EN” “http://www.w3.org/TR/xhtml1/DTD/xhtml1-transitional.dtd”>
<html xmlns=”http://www.w3.org/1999/xhtml” > <head> <meta content=”text/html; charset=utf-8″ http-equiv=”Content-Type” /> <title>Form Tutorial</title> <link rel=”stylesheet” type=”text/css” href=”style.css”> <script type=”text/javascript” src=”jquery-1.4.2.min.js”></script> <script type=”text/javascript” src=”highlight.js”></script> </head> <body> <div id=”page-wrap”> <form id=”myform” method=”post” action=”#”> <div> <div > <label for=”personname” >Name</label> <input name=”personname” type=”text” /> </div> <div > <label for=”email” >E-mail</label> <input name=”email” type=”text” /> </div> <div > <label for=”website” >Website</label> <input name=”website” type=”text” /> </div> <div > <label for=”details” >Details</label> <textarea name=”details” ></textarea> </div> </div> <!-div ></div-> <input type=”submit” value=”Submit” /> </form> </div> </body> </html> |
If you would rather use Google’s API instead of downloading a copy of jQuery, you can just replace this part of the code “<script type=”text/javascript” src=”jquery-1.4.2.min.js”></script>” with the one below:
| <script type=”text/javascript” src=”http://ajax.googleapis.com/ajax/libs/jquery/1/jquery.min.js”></script> |
Once you’ve decided where to get the source for your jQuery, let’s move on to CSS.
CSS
| *{
margin:0; padding:0; } textarea, input{ outline:none; } body{ background:#3D3D3D; } #page-wrap{ width:350px; min-height:500px; height:auto; margin:0 auto; position:relative; padding-top:50px; font:15px Arial; } #myform{ width:375px; -moz-border-radius: 8px; /* FF1+ */ -webkit-border-radius: 8px; /* Saf3+, Chrome */ border-radius: 8px; /* Opera 10.5, IE 9 */ margin:0 auto; position:relative; } #myform label{ top:10px; position:relative; color:white; } .field{ background:gray; padding:15px 15px 0 10px; height:50px; width:350px; } #myform div:first-child{ -moz-border-radius-topleft: 8px; -moz-border-radius-topright: 8px; -webkit-border-top-left-radius: 8px; -webkit-border-top-right-radius: 8px; border-top-left-radius: 8px; border-top-right-radius: 8px; } #myform div:last-child{ -moz-border-radius-bottomleft: 8px; -moz-border-radius-bottomright: 8px; -webkit-border-bottom-left-radius: 8px; -webkit-border-bottom-right-radius: 8px; border-bottom-left-radius: 8px; border-bottom-right-radius: 8px; } .area{ padding:15px 15px 0 10px; min-height:195px; } .inputfield{ padding:0 10px 0 10px; float:right; width:200px; font:15px Arial; border:2px aqua inset; -moz-border-radius: 8px; /* FF1+ */ -webkit-border-radius: 8px; /* Saf3+, Chrome */ border-radius: 8px; /* Opera 10.5, IE 9 */ } .textfield{ height:25px; padding-top:5px; } .textarea1{ padding-top:10px; padding-bottom:10px; height:150px; max-height:200px; max-width:250px; } |
If you take a look at the result at this point you’ll notice that you still have the default look for the submit button. If you want to change it, just copy/paste and add this code in your CSS.
| .submitbutton{
border: 0px; float:right; width:75px; height:40px; font:20px Arial; position:relative; top:20px; right:10px; -moz-border-radius: 8px; -webkit-border-radius: 8px; border-radius: 8px; -moz-box-shadow: 0px 0px 30px #3cdfdf; -webkit-box-shadow: 0px 0px 30px #3cdfdf; box-shadow: 0px 0px 30px #3cdfdf; background-image: -moz-linear-gradient(top, white, #3cdfdf); /* FF3.6 */ background-image: -webkit-gradient(linear,left top,left bottom,color-stop(0, white),color-stop(1, #3cdfdf)); /* Saf4+, Chrome */ filter: progid:DXImageTransform.Microsoft.gradient(startColorStr=’white’, EndColorStr=’#3cdfdf’); /* IE6,IE7 */ -ms-filter: “progid:DXImageTransform.Microsoft.gradient(startColorStr=’white’, EndColorStr=’#3cdfdf’)”; /* IE8 */ } .submitbutton:hover{ background: #3cdfdf; color:white; } |
The last piece of CSS code below will add the glowing effect to the neon edges of your input boxes. This part (@-webkit-keyframes) by the way, only works in browsers using the Webkit layout engine like Chrome and Safari:
| @-webkit-keyframes pulsate {
0% { -webkit-box-shadow: 0px 0px 0px #3cdfdf; border:2px aqua inset } 25% { -webkit-box-shadow: 0px 0px 35px #3cdfdf; border:2px aqua inset } 50% { -webkit-box-shadow: 0px 0px 0px white; border:2px white inset } 75% { -webkit-box-shadow: 0px 0px 35px white; border:2px white inset } 100% { -webkit-box-shadow: 0px 0px 0px #3cdfdf; border:2px aqua inset } } .inputfield:focus{ -webkit-animation-name: pulsate; -webkit-animation-duration: 1.5s; -webkit-animation-iteration-count: infinite; -moz-box-shadow: 0px 0px 30px #3cdfdf; box-shadow: 0px 0px 30px #3cdfdf; } |
And lastly, we’ll work on the jQuery. This part of the tutorial can actually be considered as optional since it simply adds a black background to set off the highlighted input field (see comparison image below).
If you’d like to include it in your design then just copy/paste this code in to your .js file:
| $(document).ready(function(){
var globalParent=null; var mouse_is_inside=false; /*The snippet below is activated when an inputfield is focused*/ $(‘.inputfield’).focus(function(){ globalParent=$(this).parent(‘div’); globalParent.click(); }); /*This following part will be activated when the inputfield loses focus*/ $(‘.inputfield’).blur(function(){ globalParent.click(); }); /*Following part will be activated when the user clicks anywhere inside the container div of the inputfield*/ $(‘.field’).click(function(){ if(!($(this).is(‘.dummy’))){ $(‘.dummy’).css(‘background-color’,'gray’); $(‘.dummy label’).css(‘color’,'white’); $(‘.dummy’).removeClass(‘dummy’); $(this).css(‘background-color’,'black’); $(this).children(‘label’).css(‘color’,'#3cdfdf’); $(this).addClass(‘dummy’); } }); /*The following code checks time and again whether the mouse is inside the form or not*/ $(‘form’).hover(function(){ mouse_is_inside=true; }, function(){ mouse_is_inside=false; } ); /*If user clicks anywhere outside the form, all highlighting is removed*/ $(‘body’).click(function(){ if(!mouse_is_inside) { $(‘.field’).css(‘background-color’,'gray’); $(‘.field label’).css(‘color’,'white’); $(‘.dummy’).removeClass(‘dummy’); } }); }); |
And that concludes this tutorial. Try to run or open your HTML and see if it’ll work on your browser. I personally have only tested it in the latest version of Chrome and IE9, and the blinking effect doesn’t work in IE9. Yet. Still, I hope you enjoy this one!


2 Comments
Lisa
01.24.2012
Thank you so much for the code
Free wp Plugins
02.16.2012
Hello, I enjoy reading all of your article post. I wanted to write a little comment to support you.
There are no trackbacks to display at this time.