Creating A Facebook Slider With MooTools
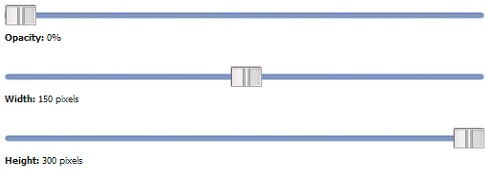
David Walsh is web developer and blogger who loves to share his knowledge and ideas on MooTools through easy-to-follow tutorials, one of which will be featured today. In this particular tutorial, you’ll be creating three sliders with a Facebook-inspired design that you’ll use to control the height, width, and opacity of an image. Below is the preview image of the slider.
To create the whole slider interface, instead of CSS, David actually used two separate JPG images as backgrounds to represent the slider button and the slider’s horizontal path.
Button:
Horizontal:
Once the images are prepared, that’s only when CSS comes in to play:
#opacity-area, #width-area, #height-area    { background:url(horizontal.jpg) 0 8px no-repeat; height:23px; width:500px; margin:0 0 5px 0; }
#opacity-slider, #width-slider, #height-slider  { background:url(button-horizontal.jpg) no-repeat; width:33px; height:23px; cursor:pointer; }
Then the XHTML markup, which basically is just the containers (aside from pieces of the sliders themselves):
<img src="muse.jpg" id="muse" />
<div id="opacity-area">
 <div id="opacity-slider"></div>
</div>
<div>
 <strong>Opacity:</strong> <span id="opacity-label"></span>%
</div>
<br /><br />
<div id="width-area">
 <div id="width-slider"></div>
</div>
<div>
 <strong>Width:</strong> <span id="width-label"></span> pixels
</div>
<br /><br />
<div id="height-area">
 <div id="height-slider"></div>
</div>
<div>
 <strong>Height:</strong> <span id="height-label"></span> pixels
</div>
<br /><br />
<p><i>The muse, as always, is Christina Ricci.</i></p>
Now comes the MooTools part (JavaScript):
window.addEvent('domready', function () {
 /* opacity slider */
 var mySlide = new Slider($('opacity-area'), $('opacity-slider'), {
 steps: 100,
 wheel: 1,
 onChange: function(step){
 $('opacity-label').set('html',step);
 $('muse').set('opacity',step / 100);
 }
 }).set(100);
 /* height slider */
 var mySlide = new Slider($('height-area'), $('height-slider'), {
 steps: 300,
 wheel: 1,
 onChange: function(step){
 $('height-label').set('html',step);
 $('muse').set('height',step);
 }
 }).set(300);
 /* width slider */
 var mySlide = new Slider($('width-area'), $('width-slider'), {
 steps: 300,
 wheel: 1,
 onChange: function(step){
 $('width-label').set('html',step);
 $('muse').set('width',step);
 }
 }).set(300);
});
And there you have your MooTools slider! You can read more about it in David’s article, and also view the demo.


