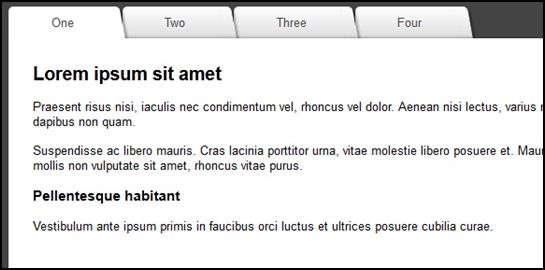
How to Create CSS3 and jQuery Folder Tabs
Calatin Rosu creates a sleek CSS3 and jQuery folder tabs that can be useful in updating your site’s look. He uses the same procedures in creating good-looking CSS3 tabs. Here’s how you can do it.
HTML
<ul id="tabs">
<li><a href="#" name="tab1">One</a></li>
<li><a href="#" name="tab2">Two</a></li>
<li><a href="#" name="tab3">Three</a></li>
<li><a href="#" name="tab4">Four</a></li>
</ul>
<div id="content">
<div id="tab1">...</div>
<div id="tab2">...</div>
<div id="tab3">...</div>
<div id="tab4">...</div>
</div>
CSS
#tabs{
  overflow: hidden;
  width: 100%;
  margin: 0;
  padding: 0;
  list-style: none;
}
#tabs li{
  float: left;
  margin: 0 .5em 0 0;
}
#tabs a{
  position: relative;
  background: #ddd;
  background-image: linear-gradient(to bottom, #fff, #ddd);
  padding: .7em 3.5em;
  float: left;
  text-decoration: none;
  color: #444;
  text-shadow: 0 1px 0 rgba(255,255,255,.8);
  border-radius: 5px 0 0 0;
  box-shadow: 0 2px 2px rgba(0,0,0,.4);
}
#tabs a:hover,
#tabs a:hover::after,
#tabs a:focus,
#tabs a:focus::after{
  background: #fff;
}
#tabs a:focus{
  outline: 0;
}
#tabs a::after{
  content:'';
  position:absolute;
  z-index: 1;
  top: 0;
  right: -.5em;
  bottom: 0;
  width: 1em;
  background: #ddd;
  background-image: linear-gradient(to bottom, #fff, #ddd);
  box-shadow: 2px 2px 2px rgba(0,0,0,.4);
  transform: skew(10deg);
  border-radius: 0 5px 0 0;
}
#tabs #current a,
#tabs #current a::after{
  background: #fff;
  z-index: 3;
}
#content
{
    background: #fff;
    padding: 2em;
    height: 220px;
    position: relative;
    z-index: 2;
    border-radius: 0 5px 5px 5px;
    box-shadow: 0 -2px 3px -2px rgba(0, 0, 0, .5);
}
jQuery
<script src="http://code.jquery.com/jquery-1.7.2.min.js"></script>
<script>
$(document).ready(function() {
    $("#content div").hide(); // Initially hide all content
    $("#tabs li:first").attr("id","current"); // Activate first tab
    $("#content div:first").fadeIn(); // Show first tab content
    $('#tabs a').click(function(e) {
        e.preventDefault();
        if ($(this).closest("li").attr("id") == "current"){ //detection for current tab
         return
        }
        else{
        $("#content div").hide(); //Hide all content
        $("#tabs li").attr("id",""); //Reset id's
        $(this).parent().attr("id","current"); // Activate this
        $('#' + $(this).attr('name')).fadeIn(); // Show content for current tab
        }
    });
});
</script>
View the live DEMO.
Click on the image to see the full tutorial.


1 Comment
saha
07.11.2012
Demo is interesting. Can I add images instead of text in the content area?
There are no trackbacks to display at this time.